Register the app with Apple
If the bundle identifier and the App Store Connect record already exist — from an earlier release, or because Eluvio set them up while helping you — there is nothing to create. Go on to Xcode signing.
Confirm first that both live in your organization's account rather than Eluvio's. An app registered under Eluvio's team cannot be transferred to you casually: App Store transfers have conditions, and it is far cheaper to register in the right account now than to move the app later.
Two separate registrations, both done in the browser. The bundle identifier is what lets you sign the app; the App Store Connect record is the listing customers eventually see. Do both before touching Xcode.
Register your app's bundle identifier
The bundle identifier is your app's permanent unique name on Apple's systems. You cannot change it after your first submission, and you cannot reuse one that another team has registered. Choose carefully.
Use reverse-DNS form based on a domain you own:
com.yourcompany.yourappname
The sample app ships as com.eluvio.wallet. You must change it — that identifier
belongs to Eluvio's team and you will not be able to sign or upload with it.
-
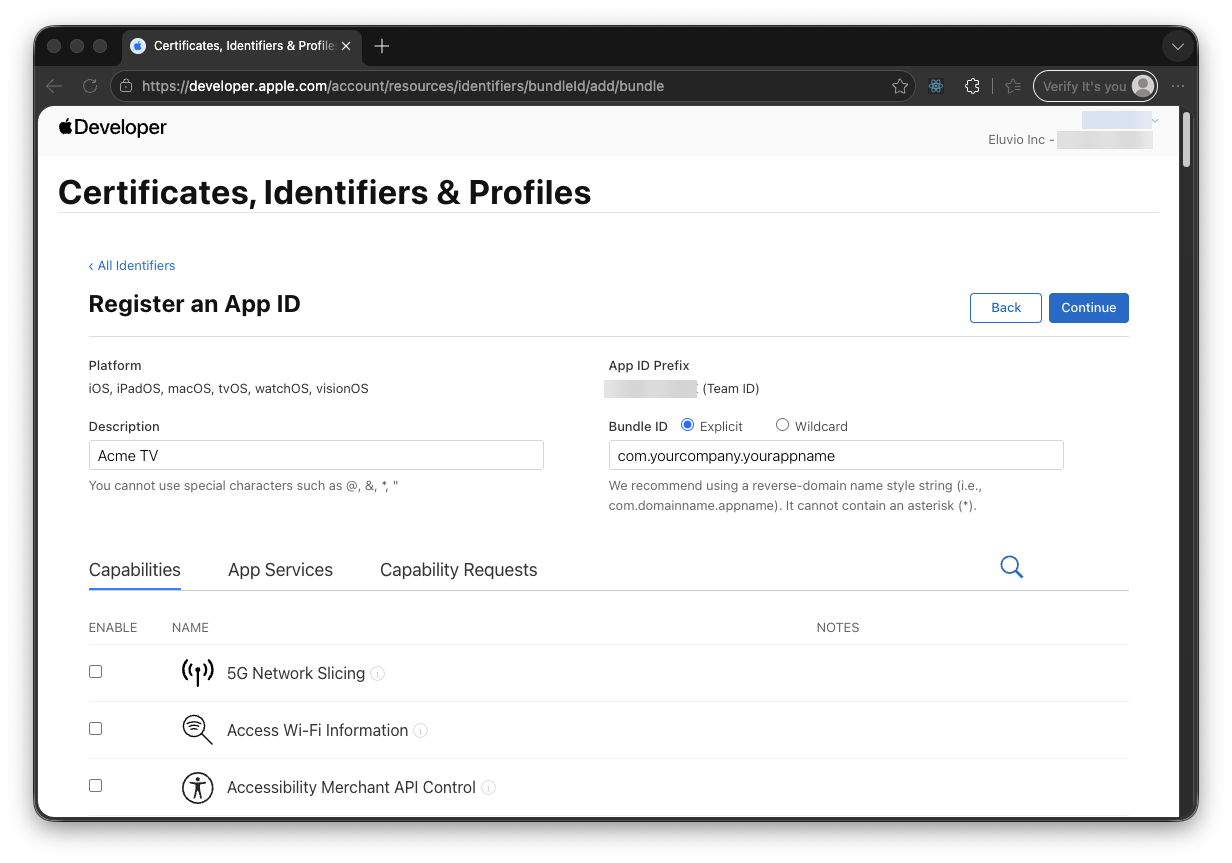
Click +, choose App IDs, click Continue, then choose App as the type.
-
Enter:
- Description — a human-readable label, e.g. "Acme TV"
- Bundle ID — select Explicit and enter
com.yourcompany.yourappname
-
Leave the Capabilities list alone. This app needs no special entitlements — no push notifications, no iCloud, no sign-in-with-Apple. Enabling capabilities you don't use causes signing errors later.
-
Click Continue, then Register.
Xcode's automatic signing can create an App ID for you the first time you archive. Doing it explicitly here is better: you see exactly what was registered, and you avoid a confusing failure mid-archive.
Create the App Store Connect record
The App ID above lets you sign the app. This step creates the listing.
-
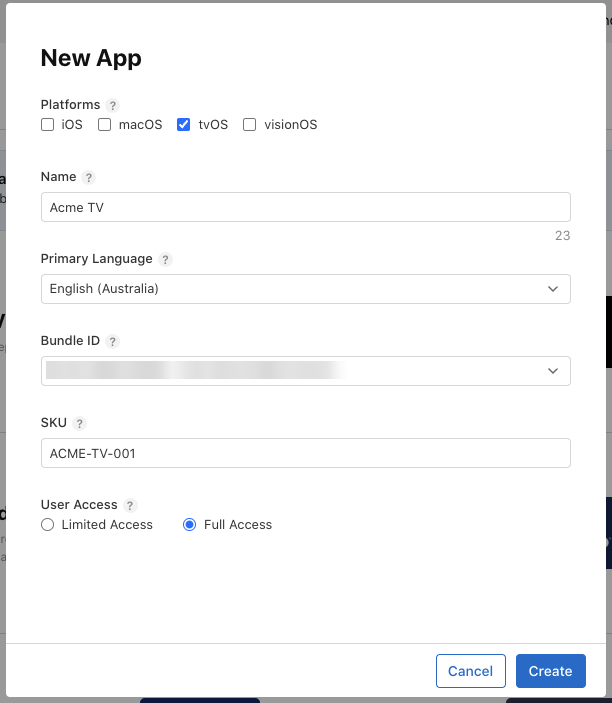
Go to App Store Connect → Apps → + → New App.
-
Fill in:
- Platforms — check tvOS. Check only tvOS unless you are also shipping an iOS build.
- Name — your public App Store name, up to 30 characters. Must be unique across the entire App Store; if your first choice is taken you will be told here.
- Primary language
- Bundle ID — select the identifier you just registered from the dropdown. If it isn't listed, wait a minute and reload; new identifiers take a moment to appear.
- SKU — an internal identifier never shown to customers, e.g.
ACME-TV-001. - User Access — Full Access unless you have a reason to restrict it.
-
Click Create.
You now have an app record in the Prepare for Submission state. Leave the metadata blank for now — the store listing step covers it. Getting a build uploaded first is the faster path to finding problems.
Next
The browser work is done. From here on it is Xcode until you have a build uploaded.