Validator Setup
Eluvio operates an Ethereum-style blockchain that uses the clique protocol for consensus. To operate a validator on the Eluvio blockchain, the server will need to run the Eluvio elvmasterd service and expose the appropriate ports to the public internet. The hardware requirements for a validator is not exotic, but it does require a minimum set of resources to participate effectively. The following document should guide you through the process of setting up, installing, configuring, and joining a validator.
Server Requirements
Detailed documentation of the validator specs are provided here.
For a Cloud node, the important points are:
- 4-8 CPU Cores
- 16-32GB Ram
- 2TB of fast storage
- Networking to the Public Internet
With these resources, a node can keep up with the clique consensus and the number of transactions that flow through the Eluvio blockchain.
The operating system can either be an Ubuntu 18.04 system, or some container platform that can run OCI images. The default installation/setup instructions will cover Ubuntu 18.04 setup, but a container based configuration will be covered in a separate document.
Hardening and Security Considerations
Full server hardening is not in the scope of this document since each organization has their own processes, tools, and baseline configurations. The following is meant to illustrate the best practices used in a typical Validator deployment. The hope is to provide information that can be layered on top of participant-specific hardening.
Validator nodes should run a server-side firewall. This server firewall should be set to allow incoming traffic for the Ethereum protocol. Ethereum servers can allow 2 types of network activity: the Ethereum wire protocol, and RPC functionality to the server itself. Of these, the RPC connectivity should be disallowed by either disabling, or configuration to only operate on the localhost.
Remote access is up to the organization setting up the validator. Remote access over SSH may be needed from time to time. It is recommended that password auth for SSH is disabled at a minimum.
Network Configuration
Validator nodes are public systems that other blockchain participants have the potential of connecting to. While the server may reject a connection due to load, in practice, the servers can accept traffic from any number of hosts via the Ethereum protocol. As such, firewalls rules should allow the following inbound:
- TCP
40304 - UDP
40304
This is configurable, so a different set of ports can be allowed.
Outbound, these ports should be allowed egress if egress filtering is desired, but note: All nodes define their own ports. Egress filtering will prevent connectivity to nodes that do not use the above ports. Some of the original nodes on the Eluvio blockchain opted to use different ports (like 40303 and 30303).
Software Installation
The elvmasterd binary is a standalone binary that can run on an Ubuntu 18.04 system. To use it, simply load the binary onto the system and run it with a valid config.
The following instructions will allow for a globally available elvmasterd by installing into /usr/local/bin. If the files are placed elsewhere, the bin directory should be set in PATH.
GCS_URL=https://storage.googleapis.com/eluvio-public-builds
ELV_TGZ=elvmasterd-912717-v5.0.0.tgz
wget --quiet -O - ${GCS_URL}/${ELV_TGZ} | sudo tar -C /usr/local -zxvf -
Note: A self-installer is in development, and the above steps will be deprecated over time.
The instructions above are not the only method for getting the software. A container is available as well.
Users and Storage
This document will presume a user is created for the purpose of running the daemon. This user can called anything, and the details of the user permissions can be altered based on site-specific security guidelines. This is just documented to facilitate the rest of the installation.
User
Create an eluvio user:
sudo useradd -c "Eluvio Validator user" -s /sbin/nologin eluvio
And create locations for configuration and logs. Feel free to change these to conform to policies. Logs should be placed on a different storage volume than the blockchain storage.
sudo mkdir /etc/elvmasterd && chown eluvio:eluvio /etc/elvmasterd
sudo mkdir /var/elvmasterd-log && chown eluvio:eluvio /var/elvmasterd-log
NOTE: Why /var/elvmasterd-log and not somewhere in /var/log? These logs can be chatty, so presumed a separate volume that is designed for this. Logging can be turned down and this can be moved.
Storage
This document will presume some NVMe device, and tools like lsblk etc will not be discusses. Also, full setup via fstab etc are not covered. For the purpose of this document, the datadir (noted below) will be an NVMe/SSD device at (e.g /dev/nvme0n1) mounted to /var/elvmasterd-data.
Note: The correct filesystem to use is either an SSD specific filesystem like F2FS or a system where journalling can be disabled, like ext4. This will presume ext4 since it is more stable, but the choice is not mandated herein.
mkfs.ext4 -O ^has_journal /dev/nvme0n1
The storage volume needs to be owned by eluvio. Run a command to set this up:
sudo chown eluvio:eluvio /var/elvmasterd-data
Network Configuration Validation
Presuming an Ubuntu system with a server/host based firewall enabled, which is ufw by default, run the following:
sudo ufw allow 40304/tcp
sudo ufw allow 40304/udp
Initial Configuration
To use elvmasterd a configuration is needed. A barebones configuration is available in the example configs section of this documentation. The following configuration snippets highlight sections that should be changed within the sample .toml.
[node] section
This is the main part of the config. Most parameters are set here.
-
Change this value to a name that identifies the validator to humans:
identity = "some-validator" -
The
datadirneeds to exist and be owned by the user that is running theelvmasterdserver/daemon. The log location should also be readable/writable by the same user. Based on log retention policies and storage layout, these should be different volumes and thedatadirneeds to be the fast, large storage noted in the specifications.datadir = "/var/elvmasterd-data" log_file = "/var/elvmasterd-log/elvmasterd.log" -
These parameters should not change, but using different ports is possible given security restraints on the deployment.
port = 40304 rpcaddr = "127.0.0.1" rpcport = 8545 -
elvmasterdwill look in thedatadirfor akeystoredirectory. By default it will use the first available keys in this dir. To pin the right address, please use the explicit hex address for the wallet/key.node_account = "0x1234abcd..."
Note: A value not mentioned, but does need consideration is ipcpath, which is set to /tmp/elvmasterd.socket. This socket can be used by anyone with read access to it to connect in with the unlocked wallet. Adequate measures should be used to secure this socket.
[hdwallet] section
The following wallet parameters are used to either generate (via elvmasterd wallet create) or in securing/accessing the wallet on setup/startup.
-
The
mnemonicneeds to be a 12 word phrase that confirms to BIP 39. This is used to generate a seed for the wallet. This can be set at the CLI, or left unset and the wallet creation (only time this is used) will generate one on the fly. If using the generated mnemonic, it is printed in the logs. This mnemonic should be saved and kept secret like a password/passphrase as it can be used to recover or re-gen a wallet.:mnemonic = "" -
The
passphrasesecures the wallet on disk. Pick a strong one.passphrase = ""
Key Generation
All validators need to have a unique wallet. The address of the wallet is used to identify the validator and is used in the enode that is used by chain participants to locate a system.
In the config above, the [hdwallet] section is used to create this, but the parameters can also be from the CLI. For the purpose of documenting key generation, both the config set parameters, and the CLI passed version will be shown.
These examples presume the datadir exists and the config file is placed in /etc/elvmasterd as config.toml (and is readable).
Keygen - Config only
/usr/local/bin/elvmasterd wallet create --config /etc/elvmasterd/config.toml
Keygen - CLI only
With supplied mnemonic:
/usr/local/bin/elvmasterd wallet create --datadir /var/elvmasterd-data --passphrase "uber-secret" --mnemonic "word1 ... word12" -n 1
Without supplied mnemonic:
/usr/local/bin/elvmasterd wallet create --datadir /var/elvmasterd-data --passphrase "uber-secret" -n 1
Keygen output
# /usr/local/bin/elvmasterd wallet create --datadir /var/elvmasterd-data --passphrase "uber-secret" -n 1
INFO [12-21|01:12:08.207] keystore                                 dir=/var/elvmasterd-data/keystore
WARN [12-21|01:12:08.213] no user mnemonic specified. creating random value mnemonic="word1 ... word12"
INFO [12-21|01:12:08.241] derive path                              wallet_path=m/44H/60H/0H/0/0
INFO [12-21|01:12:08.244] node account                             address=0xa4f2d5Ff017336Fa416949d1C2DD7c52A772df94
WARN [12-21|01:12:08.244] encrypting keystore account with default password password=uber-secret
INFO [12-21|01:12:10.343] Available accounts
INFO [12-21|01:12:10.343] account[0]                               TargetAddr=0xa4f2d5ff017336fa416949d1c2dd7c52a772df94
Note: In this sample output, the 0xa4f2d5Ff017336Fa416949d1C2DD7c52A772df94 address should be used in the configuration for node_account noted above.
Joining to Network and Syncing the local copy
Once a wallet is created and the node_account value is set in the config file, the necessary parameters are set to join the network.
The first step is to initialize the database:
/usr/local/bin/elvmasterd init --config /etc/elvmasterd/config.toml
This step creates the database used to store the blockchain. Once the database has been initialized, the next step is to start the daemon. This step can be done in a terminal window with the below command. If done this way, before the service has been daemon-ized within systemd, the daemon will run in the foreground of the terminal. The sync can take a day or longer and will then stay connected. Interrupting the sync because a terminal windows closes is not ideal, so do this only to troubleshoot a config or installation issue:
/usr/local/bin/elvmasterd start --config /etc/elvmasterd/config.toml
Daemonizing the Service
To set the service to run as a daemon that persists, a choice needs to be made to run this in a system or user scope in systemd. The simplest to document is a system scope, but the systemd units in the configuration section shows user and containerized setups as well.
Simply copy the sample provided into a file where systemd will use it, such as /etc/systemd/system/elvmasterd.service. Edit this file to conform with changes made in the local environment.
Once this file is in place, the service needs to be loaded, enabled, and started:
Note: This example presume the daemon is run as eluvio, so the user needs to exist, and the example directories of /etc/elvmasterd, /var/elvmasterd-data, and /var/elvmasterd-log are owned or read/writable by the eluvio user.
sudo systemctl daemon-reload
sudo systemctl enable elvmasterd
sudo systemctl start elvmasterd
Add Monitoring
Contact Eluvio on details.
Join Slack
Contact Eluvio.
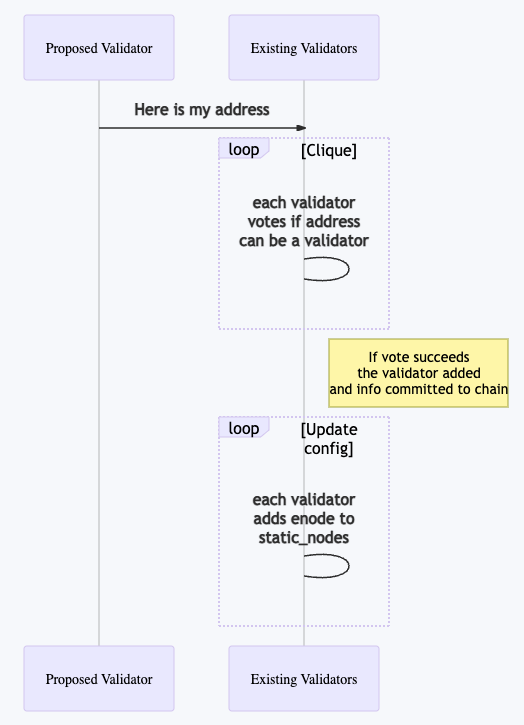
Add to Clique
While this step can be done at any time after the database is in initialized, it is best to wait for the sync to complete. One complete, the enode info and node_account needs to be provided to existing validator owners so they can add it via clique.
To get the the enode info, run the following:
Assumes install location is /usr/local
/usr/local/bin/elvmasterd attach /tmp/elvmasterd.socket --exec "admin.nodeInfo.enode"
Assumes container instance is named org-validator-01
podman exec -ti org-validator-01 /usr/loca/bin/elvmasterd attach /tmp/elvmasterd.socket \
   --exec "admin.nodeInfo.enode"
Once this information is provided, it is then used to vote in the new validator and update configurations.
Start Miner
Once added to the clique it is still necessary to start to unlock the wallet for mining and to start the mining process. The following steps can be used to unlock the wallet and start the miner:
Assumes install location is /usr/local
/usr/local/bin/elvmasterd attach /tmp/elvmasterd.socket \
   --exec "personal.unlockAccount(eth.coinbase, 'the password goes here', 0)"
/usr/local/bin/elvmasterd attach /tmp/elvmasterd.socket \
   --exec "miner.start(8)"
Assumes container instance is named org-validator-01
podman exec -ti org-validator-01 /usr/loca/bin/elvmasterd attach /tmp/elvmasterd.socket \
   --exec "personal.unlockAccount(eth.coinbase, 'the password goes here', 0)"
podman exec -ti org-validator-01 /usr/loca/bin/elvmasterd attach /tmp/elvmasterd.socket \
   --exec "miner.start(8)"